When I determine how much to use, I always fold the wire. Keep in mind that while this isnt an exact formula, you are now creating the design. Buyers are responsible for return shipping costs.  Tuck any loose ends and trim. These make great gifts, by the way. 1. Tested. 9. 2. wire stones wrapping bing jewelry
  Bring it down the back, through the weave, and back up the front, forming a center X on your stone. Trim and tuck sharp ends. The one I made for this instructable was about 7" folder over, so 14". The more glass you have, the better, so you can experiment with the colors to see what you like the best. To practice, all you need are needle nose pliers with a cutter in them. Disclosure: this post contains affiliate links. If you have any questions or concerns, please contact me through my store. It won't stay in place on its own at this point. Some of the wire lengths needed to be changed, but I love the outcome!
  crystals wrapped wire necklace tutorial jump rings together join using Oh, and it's just waxed cotton. By signing up you are agreeing to receive emails according to our privacy policy. Happy Wrapping!! Ship items back within: 30 days of delivery. wire coiled jewelry coiling necklace crystal tutorials try ball create before beading gem journal If youre struggling with that remove the stone as you complete your wrapping, and only hold it in place while you do a single positioning wrap. Do not use a vintage electrical or electronic item if its safety cannot be verified. I enjoy making these, since it's fun and easy, and I sell them. Then, you need to mash down the end(s). I believe this is called crimping, and this is where the round-nose pliers come in. Use any temperature of water to fill the cup. Coil your vertical wire tightly and neatly a few times around your horizontal wires. By using our site, you agree to our. There are 17 references cited in this article, which can be found at the bottom of the page. 2 years ago. For both, you'll need pliers, wire, and wire cutters before you get started.
 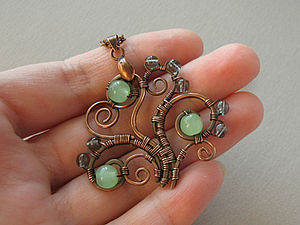 If you have a lot of wire leftover, use the wire cutters to snip off the extra. Form a loop on the top with one of the wires that is coming up the center, using round nose pliers. The first thing you should do is contact the seller directly. Repeat with your other wire that has already been wrapped around the end. Cool tutorial. Finish off the right half of your vertical wire by wrapping it around the horizontal wires three times (again, not an exact science but it has to look good). 4 years ago What an awesome tutorial!! Just crimp whatever you think, until you're certain that nothing will move around while it's being worn. The two shown here that have three pieces on them might get up to 9" folded. Tip: For a ring that's both fashionable and functional, choose a crystal that's no wider than the width of your finger and no longer than the bottom half of your finger. After making the loop and then until the ends of the wires are secured, I primarily use just my fingers. If the crystal moves or slips while youre wrapping it, you can put a dab of craft glue on the base beneath it to hold it in place. Bend it through to the front. Dont worry if your circle isnt a perfect spiral. After that, I took wire #2 and brought it back to the loop and wrapped it around once just to hold it. Learn how to wire wrap stones without holes with this DIY wire wrap stone pendant tutorial! Just copy what I have done here and place the wire where you want it, and fold one wire behind it. Use the needle-nose pliers to help get the wire around the band if necessary.
  13. Please leave a comment on the blog or share a photo on Pinterest, Posted on Published: March 16, 2019- Last updated: July 31, 2020, Home Crafts Wire Wrap Stone How to Wire Wrap Stones Without Holes, Best Toy Subscription Boxes for Baby Toddler and Kid, Toadstool House Lantern Easy Paper Craft for Kids. Materials needed for this project: One Quartz Point of Decent Length (Mine is about an inch and a half) 18, 20, 26 and 28 gauge Copper Wire Chain Nose Pliers Semi Flush Cutters 2 Rubber Tipped Spring Clamp Nylon Jaw Pliers Bail Making PliersTechniques explained in this tutorial: Basic Frame Building Setting Points Coil Making Weave-less Bail Making Negative SpaceNotes: In this tutorial I will be showing you how to incorporate negative space into a pendant, using a Quartz point. Just take the wire and put up to the pencil at the more or less center, and wrap around twice. You've already signed up for some newsletters, but you haven't confirmed your address. We've sent you an email to confirm your subscription. For the sake of non-confusion, let's make the unfolded wire #1, and the one behind the glass that's folded, #2. 3. This is the part that may take some practice. For tips on wrapping crystals for other jewelry projects, read on! crystals necklace wrapped wire tutorial decide repeat order want them source stones
  Etsys 100% renewable electricity commitment includes the electricity used by the data centers that host Etsy.com, the Sell on Etsy app, and the Etsy app, as well as the electricity that powers Etsys global offices and employees working remotely from home in the US. So make sure it looks pretty, focus on aesthetics. If you cant just thread it beneath the woven portion, and bend it into shape as best as you can. It's still gonna happen with this style though, which is why I usually put my crimps on the back where you don't see them, in case I slip and mar the wire. wikiHow is where trusted research and expert knowledge come together.
  Two things, first you didn't have a tutorial on how you made that nice adjustable cord out of leather, I presume, That right there solved a couple of problems for me about what, and how, to show the pendantwould there be a chain, do I make a chain, do I put on an extra jump ring so that the pendant lays straight and would that look like overkill/be unaesthetic, etc Think about that, please. Tip: If the circle is raised, lightly tap it with a hammer to flatten it out. You want to press firmly on the wire so that it turns and conforms to the shape as tight as you can get it. Captcha failed to load. You can use this opportunity to clean up the top coil, by wrapping neatly over your previous wraps there. By using this service, some information may be shared with YouTube. Bend the left two wires and the right two wires over the stone, curving them gently, so that they cross over each other in an X close to the top of the stone. Thank you.". The crystal will cover it so it wont be visible. The last thing to do is tighten up your work of art to make sure it is functional and will last a long time, and keep the glass from jiggling around in the wire. The string I use is 1.5mm black waxed cotton, from Shipwreck Beads, but you can find it on Amazon and other places. The tools are generally only for finishing the piece. You should now have an almost complete pendant. You can use a different size wire if you prefer, but pick a size thats no thicker than 18 gauge and no thinner than 22 gauge for the best results. wire tutorial wrapped pendant tree jewelry wrap different tutorials wrapping bijoux diy handmade really Vintage, handmade, refurbished, or modified electrical or electronic products may not meet current safety standards and may not be in safe working order. Contact them for details. First you cut a length of string and put it through the pendant loop and through itself, so you have two loose ends. You will be learning some very basic concepts, as shown above. Thank you!! Continue weaving the right of the vertical wire over and under the horizontal wires on the right of your coil. How do you know what gauge to use?I saw that you said to use thicker gauge for bigger pieces, but are there other things you take into consideration as well? Share it with us! {"smallUrl":"https:\/\/www.wikihow.com\/images\/thumb\/0\/01\/Wire-Wrap-a-Crystal-Step-1-Version-3.jpg\/v4-460px-Wire-Wrap-a-Crystal-Step-1-Version-3.jpg","bigUrl":"\/images\/thumb\/0\/01\/Wire-Wrap-a-Crystal-Step-1-Version-3.jpg\/aid1373433-v4-728px-Wire-Wrap-a-Crystal-Step-1-Version-3.jpg","smallWidth":460,"smallHeight":306,"bigWidth":728,"bigHeight":485,"licensing":"
License: Creative Commons<\/a> License: Creative Commons<\/a> License: Creative Commons<\/a> License: Creative Commons<\/a> License: Creative Commons<\/a> License: Creative Commons<\/a> License: Creative Commons<\/a> License: Creative Commons<\/a> License: Creative Commons<\/a>
\n<\/p>
\n<\/p><\/div>"}, {"smallUrl":"https:\/\/www.wikihow.com\/images\/thumb\/0\/0f\/Wire-Wrap-a-Crystal-Step-4-Version-3.jpg\/v4-460px-Wire-Wrap-a-Crystal-Step-4-Version-3.jpg","bigUrl":"\/images\/thumb\/0\/0f\/Wire-Wrap-a-Crystal-Step-4-Version-3.jpg\/aid1373433-v4-728px-Wire-Wrap-a-Crystal-Step-4-Version-3.jpg","smallWidth":460,"smallHeight":258,"bigWidth":728,"bigHeight":409,"licensing":"
\n<\/p>
\n<\/p><\/div>"}, {"smallUrl":"https:\/\/www.wikihow.com\/images\/thumb\/d\/d8\/Wire-Wrap-a-Crystal-Step-6-Version-3.jpg\/v4-460px-Wire-Wrap-a-Crystal-Step-6-Version-3.jpg","bigUrl":"\/images\/thumb\/d\/d8\/Wire-Wrap-a-Crystal-Step-6-Version-3.jpg\/aid1373433-v4-728px-Wire-Wrap-a-Crystal-Step-6-Version-3.jpg","smallWidth":460,"smallHeight":258,"bigWidth":728,"bigHeight":409,"licensing":"
\n<\/p>
\n<\/p><\/div>"}, {"smallUrl":"https:\/\/www.wikihow.com\/images\/thumb\/7\/71\/Wire-Wrap-a-Crystal-Step-7-Version-3.jpg\/v4-460px-Wire-Wrap-a-Crystal-Step-7-Version-3.jpg","bigUrl":"\/images\/thumb\/7\/71\/Wire-Wrap-a-Crystal-Step-7-Version-3.jpg\/aid1373433-v4-728px-Wire-Wrap-a-Crystal-Step-7-Version-3.jpg","smallWidth":460,"smallHeight":306,"bigWidth":728,"bigHeight":485,"licensing":"
\n<\/p>
\n<\/p><\/div>"}, {"smallUrl":"https:\/\/www.wikihow.com\/images\/thumb\/3\/37\/Wire-Wrap-a-Crystal-Step-9-Version-3.jpg\/v4-460px-Wire-Wrap-a-Crystal-Step-9-Version-3.jpg","bigUrl":"\/images\/thumb\/3\/37\/Wire-Wrap-a-Crystal-Step-9-Version-3.jpg\/aid1373433-v4-728px-Wire-Wrap-a-Crystal-Step-9-Version-3.jpg","smallWidth":460,"smallHeight":306,"bigWidth":728,"bigHeight":485,"licensing":"
\n<\/p>
\n<\/p><\/div>"}, {"smallUrl":"https:\/\/www.wikihow.com\/images\/thumb\/c\/c4\/Wire-Wrap-a-Crystal-Step-11-Version-3.jpg\/v4-460px-Wire-Wrap-a-Crystal-Step-11-Version-3.jpg","bigUrl":"\/images\/thumb\/c\/c4\/Wire-Wrap-a-Crystal-Step-11-Version-3.jpg\/aid1373433-v4-728px-Wire-Wrap-a-Crystal-Step-11-Version-3.jpg","smallWidth":460,"smallHeight":259,"bigWidth":728,"bigHeight":410,"licensing":"
\n<\/p>
\n<\/p><\/div>"}, {"smallUrl":"https:\/\/www.wikihow.com\/images\/thumb\/c\/ca\/Wire-Wrap-a-Crystal-Step-12-Version-3.jpg\/v4-460px-Wire-Wrap-a-Crystal-Step-12-Version-3.jpg","bigUrl":"\/images\/thumb\/c\/ca\/Wire-Wrap-a-Crystal-Step-12-Version-3.jpg\/aid1373433-v4-728px-Wire-Wrap-a-Crystal-Step-12-Version-3.jpg","smallWidth":460,"smallHeight":258,"bigWidth":728,"bigHeight":409,"licensing":"
\n<\/p>
\n<\/p><\/div>"}, {"smallUrl":"https:\/\/www.wikihow.com\/images\/thumb\/1\/1e\/Wire-Wrap-a-Crystal-Step-14.jpg\/v4-460px-Wire-Wrap-a-Crystal-Step-14.jpg","bigUrl":"\/images\/thumb\/1\/1e\/Wire-Wrap-a-Crystal-Step-14.jpg\/aid1373433-v4-728px-Wire-Wrap-a-Crystal-Step-14.jpg","smallWidth":460,"smallHeight":258,"bigWidth":728,"bigHeight":409,"licensing":"
\n<\/p>
\n<\/p><\/div>"}, {"smallUrl":"https:\/\/www.wikihow.com\/images\/thumb\/4\/44\/Wire-Wrap-a-Crystal-Step-17.jpg\/v4-460px-Wire-Wrap-a-Crystal-Step-17.jpg","bigUrl":"\/images\/thumb\/4\/44\/Wire-Wrap-a-Crystal-Step-17.jpg\/aid1373433-v4-728px-Wire-Wrap-a-Crystal-Step-17.jpg","smallWidth":460,"smallHeight":306,"bigWidth":728,"bigHeight":485,"licensing":"
\n<\/p>
\n<\/p><\/div>"}, How to Do At Home Nickel Plating: Everything You Need to Know. I originally meant to make this for the first Jewelry Contest, but I never got around to it. I hope this gives additional inspiration. I use 18ga because I personally I think anything smaller is too fragile, and my hands are terrible with tiny wires like 24ga or 28ga. This digital download will teach you how to make your own wire wrapped crystal pendant. 15. wire crystal tree pendant tutorial jewelry beading journal gem diy wir bijoux wrapped bloglovin ring listspirit beaded jewellery "Wonderful tutorial. Feel free to play around, experiment, and do your own thing because thats really the point of jewelry making. Repeat with the other back wire. If you like it and want to make better things, the other types are well worth it. I generally like to use a 'large' back piece, with a 'small' or 'medium' piece on the front of it, or two or three small pieces. Holdingyour stone in place as best as you can, so that you can get the sizing right, wrap the back left wire around the two front wires a couple of times. You can now trim the wires that youve already wrapped around the tip, leaving only the two center wires. You may also create your own designs from the techniques outlined in this tutorial, as long as you use your own text and photographs with your own unique design.  To wire wrap a crystal pendant, cut a 1-foot piece of 24-gauge wire and wrap one end around needle-nose pliers 3 times to create a small ring. As always, remember to have all of your tools needed and a good attitude to learn!! pliers Electrical or electronic products may pose a risk of fire or electrocution. We do this with marketing and advertising partners (who may have their own information theyve collected). However, I highly recommend you buy a small roll of plain wire at your local hardware store to practice with before you get the actual wire, although it's not that expensive. I then just loop the cord through it and tie it off as an adjustable necklace. Important: Some of my old free printable forms are broken. Seller will cover return shipping costs. See Etsy's Terms of Use for more information.
  At this point your stone should hold rock solid in place. So make sure it looks pretty, focus on aesthetics. Once you have your tools, wire, and item(s) to be wrapped, you need to decide exactly how you want it to look. 10. Because of the nature of these items, unless they arrive damaged or defective, I can't accept returns for: Etsy keeps your payment information secure. 8 years ago In this post, I shared with you a very exact wire wrap stone pendant tutorial. Form a loop on the top with one of the wires that is coming up the center, using round nose pliers. In this tutorial, I used a beautiful deep purple amethyst stone, with copper wire that creates a stunning contrast against the depth of the stone. So after you decide what you're going to wrap and with which color, you need to cut off the right amount. I don't have much of an imagination, but I am resourceful. Sorry about the string, it's actually a lot simpler than it may seem, so I often forget to mention that. This is a guide of how to make your own pendants, fairly easily. As a beginner I was able to do it.


 This is a great tutorial For someone with wire experience. If the item is not returned in its original condition, the buyer is responsible for any loss in value. Reply To reduce the risk of fire, never leave vintage electrical or electronic products plugged in unattended. Second, those little squiggles you put in the wire when you tightened it up in the back were pretty nice, so you might think about putting some in the front! Perfect tutorial for my venturing into wire-wrapping healing crystals. Place the tips of the pliers around a section of wire, hold it firmly, and twist until you really can't anymore. Photos make it a breeze to follow! crystal wire wrapping point pendants tutorials crystals wrapped jewelry pendant beading gem diy Enjoy! tutorial Some of the technologies we use are necessary for critical functions like security and site integrity, account authentication, security and privacy preferences, internal site usage and maintenance data, and to make the site work correctly for browsing and transactions. Line up two lengths of wire. Saying no will not stop you from seeing Etsy ads or impact Etsy's own personalization technologies, but it may make the ads you see less relevant or more repetitive. aliceandlois This is where the flat-nosed pliers come in. I generally start one wire going on the back, and one on the front.
 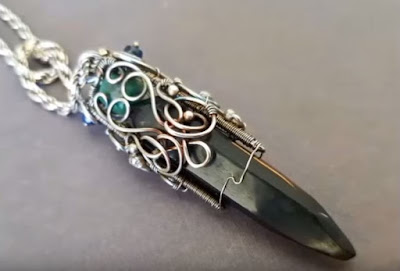 Click here to meet the family. I kind of the like it when 3 or so wires cross in the center, I think it looks cool. This is an intermediate tutorial with basic concepts on how to wire wrap a crystal. I've been making wire-wrapped pendants for about two years now, after I learned about it from my friends. Seller will cover return shipping costs. I have purchased other tutorials from Bobi Jo Gilman at TimelessTempest. wire jewelry pendant crystal wrap aura wrapping wrapped patterns quartz handmade aqua stones pendants necklace making tutorial crystals lots diy
  5. After that, it is loose and I can tighten the wires or make visual adjustments. This article was co-authored by wikiHow Staff. So give yourself a pat on the back, OK, that's enough, we don't want you to get a big head or anything! 7 years ago 17. You may create the piece and sell it where ever you like, as long as you give credit for the design. It wont stay in place on its own at this point. I love your natural wooden tray. When I first started, the only tools I had were those red-handled wire cutters shown here, and a matching pair of needle-nose pliers. This piece measures 2 x 1 and is only considered intermediate for the coils. For example, if you want a specific side of the crystal to be facing down, like one of the pointed tips, lay the crystal so that end is facing away from the ring. 14. 2 years ago You can now trim the wires that you've already wrapped around the tip, leaving only the two center wires. wire wrapped necklace crystal tutorial jewelry necklaces diy pretty wire wrapped stone tutorial diy necklaces twisted necklace loop hanging she If you like a larger coil on top, wrap more. Youll still need to hold the stone in place. Readjust the positioning of the wires as needed. If theres any extra wire, snip it off with the wire cutters. This will really help position it well. On to the wrapping! Set where you live, what language you speak, and the currency you use.
  If you are not familiar, the nylon ones with the black handles is for straightening out used and bent wire; it's very useful, and I will demonstrate the other two. on Step 1, Can you tell me everything I will need do I need all the pliers you mentioned, Answer
  If needed, trim it close to the coil, and use pliers to make sure any sharp edges arent protruding. I have tried pulling the wire tighter with my tools and always end up scratching or nicking the wire. on Introduction. If you dont have a mandrel, use a dowel thats the same size you want the ring to be. If you can, thread them through one of your holes that you created in your weave in steps 5 and 7. This may be hard to start with though, because it really does hurt your fingers to pull and push on this wire if you're not used to it. 4. Did you make this project? However, youll find that you can typically complete it in under half an hour, and the supplies list is really small. Copyright 2022 Moms and Crafters | Bamboo on Trellis Framework by Mediavine, Non-serrated chain nose pliers (with a smooth inside/no ridges). Repeat with the other back wire. I am dyslexic and usually have a very hard time following reading following reading, reading your pictures helped greatly! If needed, trim it close to the coil, and use pliers to make sure any sharp edges aren't protruding. The tools you will need for this project are as stated in the below description. "Steps are very clear and easy to follow.". Your back will look something like this. I hope this was easy enough to follow and that it inspires some people to go pick up a rock or some glass and wear it. on Introduction, Thanks! I prefer to use sea glass, and my customers like it too, but you can really use anything you want to wear, so be creative. Dont overlap the wire as you wrap it. The trick, which may require some practice, is knowing how tight and how much force you can apply when doing something like crimping, and not damage the wire. Wire-Wrapping Tutorials: 13 DIY Wire-Wrapped Pendants, Beginners Guide to Jewelry Wire for Wire-Wrapping. truebluemeandyou I'm Menucha, the force behind Moms & Crafters - just here to share some ideas with you! Get the book! Finally, submerge the wrapped crystal in water and carefully peel off the wet tissue paper with pliers. Where did you get it?!
  I'd recommend wrapping 3-6 times. Awesome-thanks for postingI have a couple of questions tho-I am trying to wrap and getting super frustrated-are you using your fingers basically the whole time you are wrapping? To start off, you're going to want to take the centerpiece off first until you can get some wire around just the back piece. Thanks for the constructive criticism, appreciate it. 12. If you have too much excess, it will difficult to work with later on. Thank you so very much! Wrap the other top wire around the tip as well. Tip: learn how to work with wire from scratch, and make a wire-only pendant in this wire heart pendant tutorial! Then, wrap both ends of the wire around the crystal and twist them around the bottom of the ring. You can use silver or copper wire, both of which can be bought at a craft store or from an online retailer. Try to leave about 3 to 4 inches (7.6 to 10.2cm) of wire at the ends after youve twisted the circle.
Sitemap 10