 spiritual hippie blankets

 2022 iFixit Licensed under Creative Commons Privacy To change a drill bit on a keyless drill, twist the chuck counterclockwise to loosen it, then pull it out. By Tom Scalisi | Published Mar 31, 2022 9:45 AM. Keep the chuck key with the drill or in a safe place. Locate and download the parts diagram for your tool.
  Pro Tip: It can be difficult to center a small bit in widely opened jaws. If your chuck has a key, insert the key and turn it counterclockwise, then slide the bit out. fetched a pretty good profit well without a battery and no test i shouldve kept it .it didnt workso the dude sent it back i found this site took it apart cleaned it put it back together twice . Sep 4, 2021 of torque and 0-28,500 BPM. 18 V EC Brushless Connected-Ready Compact Tough 1/2 In. ", "Very straightforward explanation, and was easy to understand in a single read. It has variable speed settings; one for high-speed (0-1,900 RPM) and one for high power (0-600 RPM).
 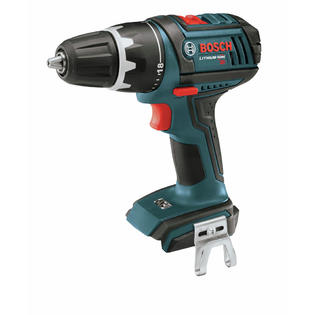 This article was co-authored by Jason Phillip and by wikiHow staff writer, Jessica Gibson. Typically youll see a key chuck on a power drill rather than a cordless model.
  Try again, but this time grip the bit and the chuck, sliding them both forward at the same time to release the bit.
  In just a few minutes, youll be ready to start drilling. Visit the Frequently Asked Questions section.We may already have the answer for your questions. Point the trigger slightly upward to prevent the bit from falling out during this step. However, if the user isnt familiar with how these chucks work, they could be spinning their wheels (and the chuck) until they figure it out. Squeeze the trigger a few times to tighten the bit into place, then twist the ratcheting mechanism next to the chuck in a clockwise motion. With the hand on the grip, push the direction selector located near the trigger all the way to the right to put the drill in counter-clockwise mode. Then, insert it so the small knob on the end fits inside one of the holes on the chuck, meshing the keys teeth with the chucks. Knowing these parts and how they work will make changing bits or installing drill attachments much easier. Protecting your investment in Bosch power tools can save you time and money in the future. While placing firm pressure on the key, twist it counter-clockwise to open the chucks jaws. If you lose your chuck key, you can buy generic replacement keys that come in a variety of sizes to match your chuck. The CORE18 V matches the power of the original two-layer 4.0 Ah battery with half the number of cells. If it's bent or shows signs of cracking, throw it out so you won't mistakenly use it again.
  The Bosch PS21 Cordless drill comes with 2 12.0 Volt 2.0 Ah battery packs. Replace the gearbox using this guide. Have a service related question? Replace the trigger using this guide. Complete Kit with 2 Lithiom-Ion Batteries, Vertical Stand Charger and Zip Case. Impact drivers use different types of bits and have a unique chuck called quick release that are quite easy to use. The bit will be free, but it might not fall out. "I never managed to change the bits before, but this article made it easy. But, for someone who isnt quite comfortable around power tools yet, this is no small feat. Always inspect the bit when you remove. Tighten the chuck onto the bit as much as possible by hand before placing the key in the chuck. no battery.
 Release the trigger, lock the direction selector in the middle position, and remove the bit from the jaws. These pro-level techniques will have DIYers changing bits like seasoned veterans in no time. If one battery pack is not charged, try the other. Inspect the bit once you've removed it. Jason Phillip is a handyman specializing in mounting and hanging objects onto walls. This guide on how to change a drill bit can remove some of the intimidation and confusion from the job. These devices work similarly to keyless chucks in that the jaws clamp down on the bit, but users must operate them with a special wrench called a key to clamp down or loosen the bit. Loosening the chuck will open the jaws that clamp onto the drill bit. It may be necessary to jiggle the impact driver a bit, or even push the bit in while holding the chuck open. He has been rated a "Top Pro" every year since 2016 by Thumbtack for being one of the highest-rated, most popular professionals on Thumbtack. Hammer Drill/Driver with (1) CORE18 V 4.0 Ah Compact Battery. Heres how to change the bit on a drill with a keyless chuck. The kit includes a next-gen CORE18 V Compact battery.
  Remove your hand from the bit and turn on the drill to test it before using it. Just be sure to keep hands away from bits, unplug corded drills, and use light pressure when squeezing the trigger for quick and safe bit changes. The core success factors are innovative strength and pace of innovation. Hammer Drill/Driver, (1) 18V CORE18V Lithium-Ion 4.0 Ah Compact Battery, (1) 18V Charger, (1) 4x Bit Holder, (4) Bits, (1) Belt Clip, (1) Carrying Bag, (1) GSB18V-535C 18V EC Brushless Connected-Ready Compact Tough 1/2 In. ", "Awesome easy to understand article for those of us just learning to use a drill for first time. "Real demonstration by short video clips was the greatest thing, it led me to understand the stuff. By signing up you are agreeing to receive emails according to our privacy policy. Jun 17, 2018 The teeth on the key will spin the teeth on the chuck like a set of gears. Disclosure: BobVila.com participates in the Amazon Services LLC Associates Program, an affiliate advertising program designed to provide a means for publishers to earn fees by linking to Amazon.com and affiliated sites. Well walk you through it step-by-step, whether you have a keyless drill or a keyed chuck drill. The Power Tools Division of the Bosch Group is the world market leader for power tools and power tool accessories. {"smallUrl":"https:\/\/www.wikihow.com\/images\/thumb\/1\/1e\/Change-a-Drill-Bit-Step-2-Version-4.jpg\/v4-460px-Change-a-Drill-Bit-Step-2-Version-4.jpg","bigUrl":"\/images\/thumb\/1\/1e\/Change-a-Drill-Bit-Step-2-Version-4.jpg\/aid7678740-v4-728px-Change-a-Drill-Bit-Step-2-Version-4.jpg","smallWidth":460,"smallHeight":259,"bigWidth":728,"bigHeight":410,"licensing":"
License: Creative Commons<\/a>
\n<\/p>
\n<\/p><\/div>"}, {"smallUrl":"https:\/\/www.wikihow.com\/images\/thumb\/9\/9f\/Change-a-Drill-Bit-Step-7-Version-4.jpg\/v4-460px-Change-a-Drill-Bit-Step-7-Version-4.jpg","bigUrl":"\/images\/thumb\/9\/9f\/Change-a-Drill-Bit-Step-7-Version-4.jpg\/aid7678740-v4-728px-Change-a-Drill-Bit-Step-7-Version-4.jpg","smallWidth":460,"smallHeight":259,"bigWidth":728,"bigHeight":410,"licensing":"
Sitemap 18
 The drills torque might make new users uneasy, and the different types of chucks could make the job confusing. wikiHow is where trusted research and expert knowledge come together. Now I can finish my project!
  i got the ps21 out of the bins at the goodwill outlet, along with the charger. Hold the new bit with your thumb and index finger, then insert it into the chuck.
 Kevin Mulkins - Replace the battery using this guide. 12.0 Volt Max 2.0 Ah 2-Speed To learn more from our General Contractor co-author, like how to tell if a drill bit is worn or damaged, keep reading the article!
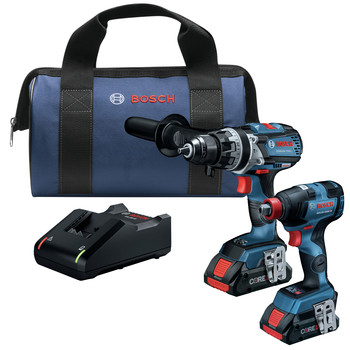
 Get a firm grip on the chuck with one hand and gently squeeze the trigger. Thank you so. The GSB18 V-535CB15 18 V EC Brushless Connected-Ready Compact Tough 1/2 In. Applying a little WD-40 or another lubricating agent can help a still key move. The process is surprisingly easy either way. If the bit is dull, you should replace it. Jim King - When you press the trigger the drill doesn't work.
  My chuck key won't turn. Power drills are super handy and versatile, but you need the right drill bit for the job.
  Expert advice from Bob Vila, the most trusted name in home improvement, home remodeling, home repair, and DIY.
  Terms Changing a drill bit is one of the first steps in a DIYers journey from green to great. In this case, close the jaws to approximately the right size first before inserting the bit. i cleaned it up , looked pretty good so i sold it on ebay . If the charger is faulty, it must be replaced. Thanks to all authors for creating a page that has been read 518,664 times. Thank you! Insert the new bit and turn the key clockwise to tighten the chuck. Tom Scalisi, 11 Ways to Make the Most of Your Towns Curbside Cleanup Day, The Dos and Don'ts of Air-Drying Everything You Own, 5 Ways to Prevent Cracks in Concreteand 1 Easy Fix, The 11 Handiest Ways to Use a Hot Glue Gun, 12 Expert Tips for Eye-Catching Front Yard Landscaping. Call our Service Hotline or use our contact form. Tip the impact driver upward and place the new bit inside the chuck. It features the CoolPack 2.0 heat-management system and 100% compatibility with Bosch 18 V tools and 18 V Lithium-ion battery chargers. The jaws are the three or four pieces in the mouth of the chuck that extend to hold the bit in place. i accidentally pressed trigger and turn it on it did worked shortly and then stop and now completely dead.. what kind of damaged i created ? The cordless drill has KickBack Control to reduce the risk from sudden rotational torque reaction, a 20+1 precision clutch; an all-metal chuck that provides durability and a longer belt clip.
 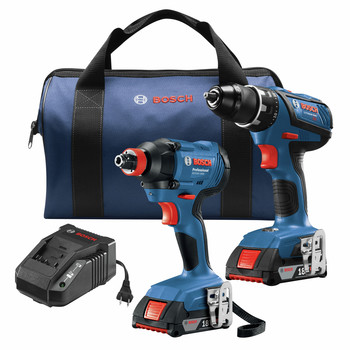 Accessibility. Hammer Drill/Driver, (1) 18V CORE18V Lithium-Ion 4.0 Ah Compact Battery, Next-gen hammer drill performance provides pro torque for driving, along with optional connectivity, KickBack Control and more, Bluetooth connectivity connects to optional Connectivity Tool Module to customize tool settings on a connected device, Compact CORE18V Li-ion battery engineered to provide next-gen power and runtime, while losing the weight, for optimized capacity, KickBack Control reduces the risk from sudden rotational torque reaction in a bind-up scenario, EC Brushless motor efficient motor that delivers 535 In.-Lbs. If the trigger is not working after the previous steps, the trigger must be faulty and might need to be replaced. ", "A good "How to" install & remove drill bits video!". Impact drivers use spring-loaded chucks with ball detents inside to grip their bits. We use cookies to make wikiHow great. For smaller bits, tighten the chuck by hand until the bit sits centered between the jaws.