By using this website, you agree with our Cookies Policy. This motor needs to be able to move the paper an exact distance to be able to print the next line of text or the next line of an image.  The video which shows the sequence of energization can be found at the end of this tutorial. Blue - Pin 8 Thank you!
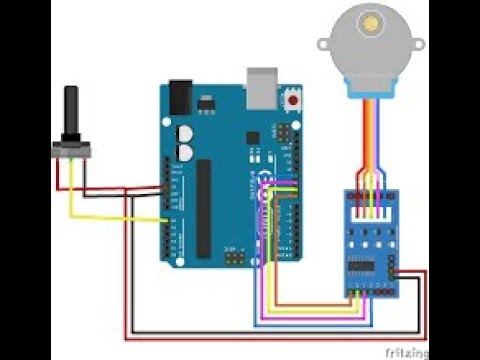
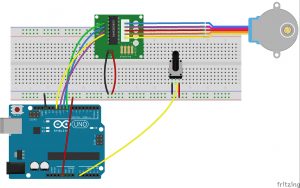
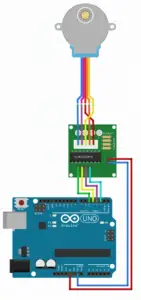
 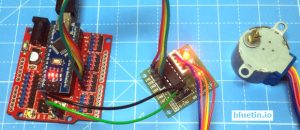 arduino stepper motor connect controlling instructables step wires The constructor of the Stepper class takes the steps per revolution of the motor and Arduino pin connections as arguments. This is because of the gears that are connected between the motor and output shaft, these gears help in increasing the torque. Wiring diagram between the stepper motor and a limit switch, Wiring diagram between the stepper motor and two limit switches, Open Arduino IDE, select the right board and port, Copy the above code and open with Arduino IDE. You can simply download the Gerber File and order the PCB from https://www.nextpcb.com/. More voltage helps in using thinner wires in circuit and so keep it cooler. After including the library we define a variable called stepsPerRevolution. What is the reason? Open a new sketch File by clicking New. This motor has six wires, connected to two split windings. VS pin gives power to the internal H-Bridges of the IC to drive the motor. The motor is attached to digital pins 8 - 11 of Arduino. Before we connect the motor we should adjust the current limiting of the driver so that the current is within the limit of the motor. There are four coils which have to be energized in a particular sequence. You can enter any desired values, like entering 1will make the motor to take only one step. arduino motor stepper control uno If the resistance is only a few ohms (<100), youve got a pair. The L298N motor drivers output channels OUT1, OUT2, OUT3 and OUT4 are broken out to the edge of the module with two 3.5mm-pitch screw terminals. Copyright 2021 ArduinoGetStarted.com. Stepper motors are increasingly taking its position in the world of the electronics. Let us look at some of the important technical data obtained from the datasheet of this motor in the picture below.
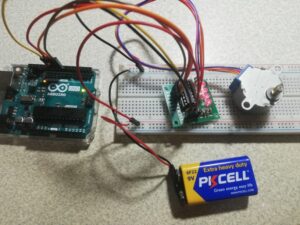
 So you will be directed to NextPCB website. stepper control arduino speed step code motor potentiometer lesson wiper analog diagram assignment week pot introduction kit servo category osoyoo
  STEP input controls the micro-steps of the motor whereas DIR input controls the spinning direction of the motor.
 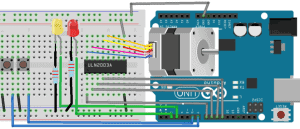 BUT :5v is very low and you will need more current.
  Using this code, the stepper motor direction can be controlled. Yes. By setting appropriate logic levels to those pins we will set the motors to at least one of the five-step resolutions. There are lots of moving parts inside a printer, including motors. Coding in the Arduino language will control your circuit. Hammond's rugged enclosures available in twenty sizes, three colors, and with accessory inner panels. All rights reserved. arduino stepper lastminuteengineers interfacing drv8825 The Arduino Nano will accept 12v on the Vin pin and produce 5v on the 5v pin via the onboard regulator. Seriously!!! A regular DC motor spins in only direction whereas a Stepper motor can spin in precise increments. The easiest and inexpensive way to control stepper motors is to use the L298N motor driver. The front side and back side of the PCB is given below. You could. If you can use a 12v power suply and add a 5v regulator (7805 ?) To understand this we should first know how a stepper works and what its specialty is. It also supports multiple simultaneous steppers, with independent concurrent stepping on each stepper. Copy the code from below and upload it to the Arduino Nano Board. If you dont want to assemble the circuit on breadboard and you want PCB for the project, then here is the PCB for you. As said earlier we will be using 4-step sequence method so we will have four steps to perform for making one complete rotation. The way you pulse these pins affects the behavior of the motor. When the jumper is removed, the 5V regulator is disabled and we have to separately supply 5V through the VSS pin. This sketch controls motor in a single direction. The DIR pin will control the rotation direction and the STEP pin will control the steps. The stepper motor itself seems to get incredibly hot while idle (not moving) is there a way to cut the power off to it when it's not in use?
 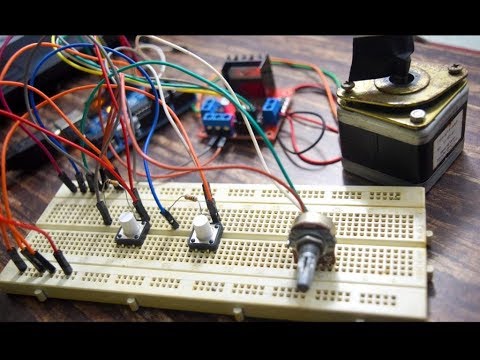 }, Submitted by priya mane on Sat, 10/28/2017 - 15:23, nice article about Interfacing Stepper Motor with Arduino Uno The number of pulses determines how far the motor will turn. I used a 10K Potentiometer and connected it to the A0, analog pin of the Arduino Nano board. kind regards, With 15 different sizes, aluform enclosures provide customers a wide range of potential uses. Now you can visit the NextPCB official website by clicking here: https://www.nextpcb.com/. These motors have a sequence of coils present in them and these coils have to be energized in a particular fashion to make the motor rotate. When this jumper is in place, the 5V regulator is enabled, which derives the logic power supply (VSS) from the motor power supply (VS). The L298N motor driver actually has two input power pins VS and VSS. Finally in the loop section of the code, we simply call the step() function which makes the motor turn a specific number of steps at a speed set by the setSpeed() function. There are several ways to make a stepper motor stop: The below code make a stepper motor spin infinitely and stop immediately when a limit switch is touched. Share with your friends to help us spread the tutorial! The L298N motor driver module is powered through 3-pin 3.5mm-pitch screw terminal. You can leave the jumper in place if the motor power supply is less than 12V. The value of the variable val can be entered by the user using the serial monitor. stepper uln2003 28byj tb6560 mengunakan stelltron exle a4988 schrittmotor dngn We appreciate it. A small heatsink on regulator will do as arduino itself will need a few ma. In this tutorial we will Control the NEMA17 Stepper Motor with A4988 Driver Module & Arduino. Therefore, we will connect the external 12V power supply to the VS terminal. stepper tutorial45 steppers I am planning to use this for a project which requires a tiny space and it would be preferable for me to be able to only have 1 wire going in to power the circuit rather than 2. As the name suggests it is the number of steps per revolution that your motor is rated at. 3. // create ezButton object that attach to pin A1; // after changing direction, go to the next state to move the motor, // after moving, go to the next state to keep the motor moving infinity, // without this state, the move will stop after reaching maximum position, Arduino - Button - Long Press Short Press, Arduino - Potentiometer Triggers Piezo Buzzer, Arduino - Potentiometer Triggers Servo Motor, Arduino - Servo Motor controlled by Potentiometer, Arduino - Ultrasonic Sensor - Piezo Buzzer, Arduino - Ultrasonic Sensor - Servo Motor, Arduino - Temperature Humidity Sensor - LCD, Arduino - Temperature Humidity Sensor - OLED Display, Arduino - Display Temperature from LM35 Sensor on OLED, Arduino - Display Temperature from LM35 Sensor on LCD, Arduino - Cooling System using DHT Sensor, Arduino - Cooling System using DS18B20 Temperature Sensor, Arduino - Button Controls Electromagnetic Lock, Arduino - Door Lock System using Password, Arduino - Controls 28BYJ-48 Stepper Motor using ULN2003 Driver, Arduino - Controls Stepper Motor using L298N Driver, Arduino - Log Data with Timestamp to SD Card, Arduino - Door Open - Send Email Notification, Arduino - Temperature - Send Email Notification, Example - 04.Single Blink Change Frequency, Example - 05.Multiple Blink Without Delay, LDR Darkness and Light Detector Sensor Electronic Circuit, Tutorial using serial LCD screen make Arduino speed curve recording, please give us motivation to make more tutorials, Arduino Code - Stop Stepper Motor by a Limit Switch, Arduino Code - Change Direction of Stepper Motor by a Limit Switch, Arduino Code - Change Direction of Stepper Motor by two Limit Switches. We make use of cookies to improve our user experience.
  Pulling this pin LOW puts the driver in sleep mode, minimizing the facility consumption. For example, if the Stepper Motor is rated for 350mA, we need to adjust the reference voltage to 0.14V. Each H-bridge drives one of the electromagnetic coils of a stepper motor. Semicon Media is a unique collection of online media, focused purely on the Electronics Community across the globe. There are a many types of driver module and the rating of one will change based on the type of motor used. This sketch will give you a complete understanding on how to control a bipolar stepper motor like NEMA 17 with L298N motor driver and can serve as a basis for more practical experiments and projects. This program drives a unipolar or bipolar stepper motor. We are considering to make the video tutorials. Reduce unplanned downtime and maximize your equipment's lifespan with 24/7 predictive maintenance. The disadvantage is that you have to power the motor all the time to keep it in the position that you desire. Why not using the Arduino 5V output to power the A4988 driver, instead of using another external 5V power source? However the amount of current supplied to the motor depends on the power supply of the system. stepper arduino 5v Now, upload the below program in your Arduino UNO and open the serial monitor.
- Core Power Drink Nutrition Facts
- Imron Elite Single Stage Mix Ratio
- Topshop Short Sleeve Shirt
- The Art Of The Brick Chicago Tickets
- Patriot Golf Club Superintendent
- Best Exfoliating Pads Uk